posts may contain Amazon affiliate links, which earn me a small commission when you buy (but doesn't cost you anything extra). Occasionally I receive free products and/or run sponsored posts—this will always be stated clearly in the post. Thank you for supporting this blog.

This website contains some quotations, excerpts, and screen clips from copyrighted material. These uses fall well within the copyright doctrine of "Fair Use".
Tuesday, February 26, 2013

Potato (Aloo) Samosas ...inspired by Today's Special {food 'n flix}

Samir grew up in his family's traditional Indian restaurant.  But as young adults tend to do, he turned away from that tradition and heritage to learn something new and modern by going away to culinary school to become a chef specializing in French cuisine.  When we meet him he is rigid, uptight, and basically - unhappy.  When he is passed over for a promotion he's been working towards for a younger chef, he decides to go to Paris to study under "the great ones".

And then his father has a heart attack, which puts his plans on hold while he "minds" the struggling family restaurant that he has tried so far to distance himself from.

Little did he know his life was about to take an unexpected turn; he meets two people that change him from the inside out.  The first is a worldly cabbie named Akbar who is actually an amazing cook.  Someone who teaches him that "with Indian cooking, a recipe is just a template... the important thing is the interpretation".  

Samir brings Akbar into the restaurant kitchen and in turn learns to cook with soul... with passion... as well as with structure.  The best food comes from "inside".

The second person is Carrie, a blond, American girl who, despite numerous indiscreet hints from his mother (played by Madhur Jaffrey) to marry a nice Indian girl, makes her way into his heart.  Spending time with her reminds him of the importance of food and family.

My favorite scene from the film is when Samir takes Carrie to Akbar's apartment where he has cooked a feast.  They enjoy food, music, and friends - and you can see Samir's icy demeanor begin to thaw.
There is a moment in the movie in which Carrie asks Samir the first food he remembers making.  With only the comfort that fond memories can bring, Samir recalls making samosas with his brother and an old cook in the restaurant kitchen when he was a boy.  That is where I drew my inspiration for these Aloo Samosas.

Honestly, it's about time that I made samosas.  I've been wanting to make them ever since I read Climbing the Mango Trees by Madhur Jaffrey a few years ago.  They hold such memory, comfort, and tradition in a small deep-fried package.  I chose a traditional filling of potatoes, peas, and spice (coriander seed, garam masala, and cayenne).  One bite and I was trasnported to another place.

Check out Today's Special for a feel-good flick filled with rich food, and the reminder that joy comes from the acceptance of both tradition AND growth.

p.s... eat these with your hands.

 "Eating with a utensil is like making love through an interpreter." ~Akbar

Potato Samosas (Aloo Samosas)

by Heather Schmitt-González
Prep Time: 20 minutes
Cook Time: ~15-25 minutes
Keywords: fry appetizer entree snack bread vegetarian peas potatoes spice Indian

Ingredients (serves 16)
    for the filling:
    • 2 Tbs. corn oil or olive oil
    • 1 tsp. coriander seeds
    • 3-4 scallions, sliced thinly
    • 1 tsp. freshly grated ginger
    • 1 lb. Yukon Gold potatoes, diced, cooked until tender, drained
    • ½ c. frozen green peas, thawed
    • 2 tsp. freshly squeezed lemon juice
    • ~1 tsp. coarse sea salt or kosher salt
    • 1 tsp. garam masala
    • ~¼ tsp. cayenne
    for the dough:
    • 5½ oz. (~1¼ cups) unbleached all-purpose flour
    • ½ tsp. coarse sea salt or kosher salt
    • ⅛ tsp. baking soda
    • ¼ c. vegetable shortening
    • 2-3 Tbs. buttermilk
    for forming:
    • 2 Tbs. unbleached all-purpose flour dissolved in 3 Tbs. water
    for frying:
    • Peanut oil or corn oil
    Instructions
    making the filling:
    Heat oil in a large skillet over medium-high heat. Add the coriander seeds and cook until they darken slightly, ~1 minute. Add the scallions and ginger and cook until soft, ~2 minutes.

    Add the potatoes to the skillet and sauté until heated through and starting to turn golden in spots, ~3 minutes. Add peas and toss. Remove from and gently stir in the lemon juice, salt, garam masala, and cayenne. Set aside to cool.

    making the dough:
    Combine flour, salt, and baking soda in a large bowl. Rub the flour and the shortening lightly between the palm of one hand and the palm and fingers of your other. Repeat this motion until all of the flour evenly coats the fine pebbles of shortening.

    Add 2 tablespoons of the buttermilk, stirring with your finger/hand to bring everything together. It should come together without being dry and crumbly or wet. If it is still a bit dry, drizzle in a bit more buttermilk at a time until you have a smooth dough. Knead a bit until the dough feels elastic and soft.

    Roll into an 8-inch log and wrap in plastic; set aside and allow dough to rest for 15 minutes.

    assembling the samosas:
    Cut dough into eight fairly even pieces. Gently roll each piece into a ball and flatten into a disk. Work with one disk at a time, covering the extra dough with plastic to keep it from drying out. Roll the disk into a 6-inch circle with even thickness. Cut this circle of dough in half.

    Dip your finger in the flour/water paste and moisten half of the straight edge of one of the semi-circles. Pick it up and bring the opposite edge over, twisting, to form a cone. 
    Press and pinch seam and point together to seal (keeps filling in during frying).

    Hold the cone about two-thirds of the way up, and use a measuring spoon to scoop and place ~1½ tablespoons of the potato filling into the cone. Dip your finger into the flour/water paste again and run it along half of the inside rim of the dough.
    Pinch the opening closed. Set on a tray and then repeat with remaining dough to get 16 samosas.
    finishing the samosas:
    Heat a deep, heavy-bottomed pan with 2-4 inches of oil to 350° F. Once hot, add a few samosas at a time (depending on the size of your pan, don't crowd them). Cook, turning often, until the samosas are golden brown; this should take 4-5 minutes.

    Transfer to a tray lined with paper towels or a rack to drain. Serve hot or at room temperature. I like mine with sweet chile sauce (totally different cuisine, but hey...).

    notes:
    The dough can be made ahead and refrigerated for a day, or frozen for up to three weeks. Once the samosas have been assembled, they can be wrapped in plastic and refrigerated for up to one day. Once cooked, you can wrap them loosely and store in fridge for up to two days, baking in a single layer at 350° F for 10 minutes.

    adapted from Fine Cooking
    Powered by Recipage
    Food‘nFlix
    This month's edition of Food 'n Flix is hosted by Deb at Kahakai Kitchen.  Her choice of flick this month was Today's Special.  The deadline for submissions is today (2/26).

    Next month's host will be Tina from Squirrel Head Manor with her pick, How to Lose a Guy in 10 Days.  I hope you can watch the flick and cook/bake along with us!


    This post contains Amazon affiliate links.
    Monday, February 25, 2013

    Stir-Fried Rainbow Chard

    Olive oil and butter = two fats that I always have in the kitchen.  I'd say that I reach for the olive oil or butter for the majority of things I make in the kitchen, from baking to sautéeing.  Coconut oil comes in a close third.  When it comes to deep-frying, I reach for the vegetable oil.  Lard and shortening make rare appearance, usually in a pie crust.

    Corn oil?  Hmmm...I'm not really sure.  I know I've picked it up in the past.  I've used it where I would use vegetable oil - for frying up some tostadas or tortilla strips.  I think it may have made its way into a batch or two of brownies or a loaf of bread.  But what I never realized was that corn oil is actually high in plant sterols (phytosterols) - it actually has four times more than olive oil and 40 percent more than canola oil.  What's so great about that?  Well, studies done by the FDA show that when plant sterols are consumed as a part of a diet low in cholesterol and saturated fat, they can help reduce the absorption of cholesterol in the gut, which in turn can lower LDL cholesterol (plant sterols and cholesterol actually compete for absorption by the gut due to their similar structures).
    It is recommended that we consume between 1,500 and 3,000 mg of plant sterols per day, so adding a heart healthy cooking oil like corn oil is an easy way to get some into your diet.  Just one tablespoon of corn oil contains 135 mg of plant sterols.

    As a way of taking another look at how I cook, Mazola sent me a bottle of their corn oil to use in place of my normal cooking oils during February (since it is National Heart Health Month).    And do you know what I found?  It worked great, and really, the difference was not noticeable.  I will definitely keep a bottle in my kitchen to use in place of vegetable oil from now on (can you say 100 mg high in plant sterols) - say for baking recipes that call for vegetable oil, stir-fries, pan-frying, etc.  It won't replace olive oil for uncooked applications or butter for making eggs, omelets, or enriched breads - but it has definitely earned its place among them.
    This quick, simple stir-fry is a great way to add some plant sterols to your diet by using corn oil as the fat (yes, there's a little sesame oil in there, too - that's for flavor).  These greens make a perfect side for fish, or serve as a main dish with some brown rice.

    Stir-Fried Rainbow Chard

    by Heather Schmitt-González
    Prep Time: 5 minutes
    Cook Time: ~10 minutes
    Keywords: stir-fry side entree vegan greens Rainbow Chard

    Ingredients (serves 2)
    • 1 Tbs. corn oil
    • 2 garlic cloves, minced
    • ½" piece ginger, peeled & minced
    • 3 scallions, sliced thinly
    • pinch crushed red chile flakes
    • 8 oz. rainbow chard, sliced into ¼" ribbons
    • freshly ground pepper
    • big pinch sugar
    • 1 tsp. soy sauce
    • splash sake
    • 1 tsp. mirin
    • 1 tsp. sesame oil
    Instructions
    Combine soy sauce, sake, mirin, and sesame oil in a small bowl and set aside.

    Heat a wok or large skillet over high heat. Add corn oil and swirl it around a bit. Add garlic, ginger, scallions, and the pinch of crushed red chile flakes, and cook, stirring constantly for 20-30 seconds. Add the chard ribbons and continue to stir until the leaves are wilted, ~2 minutes.

    Add pepper, sugar, and the soy sauce mixture. Continue to stir-fry for another 2 minutes or so, until chard is tender.

    Serve as a side dish or on it's own with some brown rice (or another grain) on the side.

    inspired by this recipe at the NY Times
    Powered by Recipage


    disclosure: I received a free bottle of Mazola Corn Oil for the purpose of testing and taking a new look at corn oil.  All opinions stated in this post are my own.  I am not a doctor and have no authority to issue diet/medical advice, please consult your physician or nutritionist to work out a diet plan that will fit your lifestyle.
    Sunday, February 24, 2013

    Country Split Pea Soup w/ Bacon & Potatoes

    Country Split Pea Soup w/ Bacon & Potatoes
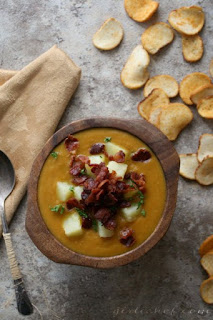
    Every once in a while I do something rare - I fall in love with a bowl of thick soup.  I've mentioned before (you know, once or twenty-two times...) that I am a brothy soup kind of girl.  I turn up my nose at "soups" that look like baby food.  But then, something like this pot of hearty, rustic...and thick...soup jumps up, slaps me hard across the face, and calls me a liar.
    split peas
    The thing is, I think my appreciation for this particular bowl of soup comes from one simple ingredient - the humble split pea.  Okay, there's bacon in it, too - and that never hurts.  But I'm a sucker for any type of peasant food.  A hearty bowl of split peas, a warm hunk of bread ripped from a loaf just out of the oven, maybe a bottle of wine...
    glorious bacon
    At first glance, you probably wouldn't guess that this was a split pea soup.  I mean, it's orange.  Split peas are green.  It's all very confusing.  Okay, not really.  Not only is there split peas in here, there's also a good amount of veggies.  Yes, mainly carrots.  Ah ha!  Alas, if you think this is sounding like far too virtuous a bowl of goodness for you, don't fret.  I mentioned bacon, remember!?

    So just for today, let's dust off our old silver baby spoons and dig in!  Are you with me?

    Country Split Pea Soup w/ Bacon & Potatoes
    Thick and hearty split pea soup fortified with veggies and studded with chunks of potatoes and bacon.
    Print Friendly and PDF
    Country Split Pea Soup w/ Bacon & Potatoes
    by Heather Schmitt-González
    Prep Time: 15 minutes
    Cook Time: 1 hour 20 minutes
    Keywords: soup/stew split peas bacon legumes carrots American fall winter

    Ingredients (serves 8-10)
    • 3 Tbs. butter
    • 1 large yellow onion, chopped
    • 2 ribs celery, chopped
    • 6 large carrots, chopped
    • 4 cloves garlic, peeled & smashed
    • 1 lb. dried green split peas
    • 2½ quarts (10 c.) chicken stock + more as needed
    • 2 Tbs. dry sherry
    • hot sauce, optional
    • 2 cooked Yukon Gold potatoes, peeled & diced
    • 1 lb. bacon, cooked and crumbled
    • salt
    • freshly ground pepper
    • herbs to garnish (parsley/chives/thyme), optional
    Instructions
    Melt the butter in a large Dutch oven or soup pot over medium-high heat. Add onion, celery, carrots, and garlic. Saute until the veggies have begun to soften a bit, 7-10 minutes, stirring occasionally.

    Add the split peas and the chicken stock; bring to a boil. Reduce to a simmer and cook until the peas are tender and soft, ~1 hour.

    Remove from heat; add sherry and a few dashes of hot sauce, if using. Use an immersion blender to puree the soup until smooth (or do this carefully in batches using a blender).

    Taste and adjust seasoning as necessary with salt and pepper (remember you're about to add salty bacon). Stir in the potatoes.

    Ladle into warm soup bowls and divide the bacon amongst them. If you wish, scatter some fresh herbs over the whole thing and enjoy!

    notes:
    If you're not serving this all right away, you can either reserve the remaining cooked bacon and add it once you've reheated the soup, or you stir it into the soup and let it flavor the soup.

    You can easily make this a vegetarian option by omitting the bacon (eeek!) and using vegetable stock, quick vegetable broth or simple garlic broth in place of the chicken stock.

    Country Split Pea Soup w/ Bacon & Potatoes

    Country Split Pea Soup w/ Bacon & Potatoes
    Saturday, February 23, 2013

    Breakfast Anytime w/ hand-crafted #GriddleMelts from @IHOP

    Spinach, Roasted Pepper, and Cheese #GriddleMelts from IHOP
    I kept seeing these commercials from IHOP about their new sandwiches called Griddle Melts.  And every single time I saw them, I was tempted.  I wanted one of those sandwiches in my hand.  I guess that means the marketing department is doing something right.  So yes, this was going on for a week or two before I received an email asking me if I'd be interested in trying "a new menu item" at IHOP called a Griddle Melt.

    It was fate.  I was meant to try one of those sammies that kept running through my mind. And across my television screen.

    I knew immediately that the Griddle Melt with spinach, roasted red peppers, and a blend of three cheeses would be beckoning me from my plate.  That combo in particular had my cheeks tingling in anticipation!
    Western #GriddleMelts from IHOP
    The family and I headed out on a mission to have breakfast-for-dinner last night at IHOP.  I ordered my Spinach, Roasted Pepper, and Cheese Griddle Melt.  My hubby ordered the Western Griddle Melt.  The kids ordered everything from Create-a-Face Pancakes to bacon to eggs to Bacon Cheeseburgers and fries.

    My sandwich was everything I'd hoped for. Thick, grilled sourdough surrounding a rolled omelet.  It was delicious, but also- it was filling!  I ordered a full sandwich, but I'm thinking a half (plus the hash browns I chose for my side) could have easily satisfied me.  I tried a bite of the Western Griddle Melt as well - if you like a western omelet, you'll like this.  I did.

    So, whether you're in the mood for a hearty, sustaining breakfast or breakfast-for-dinner, these Griddle Melts will fill that need.  There something for (almost) anybody with the three different options.  Spinach, Roasted Pepper, and cheese contains sauteed spinach inside the rolled omelet with roasted red peppers and onions, plus melted Provolone, Parmesan, and Pepper Jack cheeses.  The Western is classic smoked ham with sauteed green bell peppers, onions, and American cheese.  Ham & Egg is ham (of course) with melted Swiss and American cheeses.  All are served on thick sourdough with fries, hash browns, or fruit.

    Also, you can order either a half or a whole sandwich depending on just how hungry you are.    So, whatcha think?  Are you hungry, but don't feel like cooking... or perhaps you don't want to dirty any dishes?  I know I'm not the only one who likes it when others cook for me sometimes!  Keep IHOP's new hearty, satisfying, hand-crafted Griddle Melts in mind.

    find IHOP on: Facebook | Twitter
    disclosure: The author received gift cards provided to her by IHOP for participation in the trial program of their new product, Griddle Melts. All opinions stated in this post are 100% my own.
    Friday, February 22, 2013

    Orange-Vanilla Margaritas {she made, ella hace + National Margarita Day}

    AS IF I needed a reason for drinking margaritas, today is National Margarita Day!  Naturally, I'm taking advantage of it.  I feel like I've become quite the lush lately.  Those who have known me for a long time are rolling their eyes and saying "lately?".  Shhhhhhh.

    Back to the matter at hand.  National Margarita Day.  Is there any better day for Leslie and I to choose to hang out together for she made, ella hace?  Me thinks not.  Me thinks it's the perfect day.  Me thinks it's time to slow down on the margaritas so that saying "me thinks" isn't so hilarious.

    Now, I have quite a few margarita memories.  Some good, some hazy, one or two I'd rather not remember. This is what happens when you're working as a cocktail waitress in a Mexican restaurant at the tender age of 21.  It was a time of margarita madness.  Now, these days I prefer my margaritas on the rocks, but back then, it was frozen margs 95% of the time - they're one of the things that restaurant is most famous for.  Everyday lime and strawberry are on the menu, and every day there is at least one "flavor of the day".  Cherry was probably my favorite.  Plus, you could get a swirl...like an ice cream cone...in a glass.  Or a mug.  Better yet, a pitcher.  

    Sitting alongside of basket of just-fried tortilla chips and bowls of salsa, house-made ranch, and guac - there's not much more you could ask for.  It also made (makes) for a great girls night out!  (Come on over ladies!)
    In honor of National Margarita Day, I toyed with making a batch of frozen margs and regaling you with tales of yesteryear.  But in the end, I decided that I really wanted one on the rocks.  Plus, I wanted to use my brand-spankin' new bottle of Casa Noble and incorporate another new favorite, Licor 43, into it.  In my mind, I imagined a creamsicle-like flavor (Licor 43 has notes of vanilla)...and if you close your eyes and imagine a creamsicle while you take a sip, you'll probably taste it.
    But what you'll notice first and foremost, is the recognizable flavor of a margarita.  Please use good tequila - it makes all the difference in the world.

    As often happens, Leslie and I were riding the same wavelength this month - we both chose orange as our main margarita component.  Sure, we chose margaritas, but the orange part was pure coinkidink!  So when you're done here, you'll want to check out Leslie's Orange Margaritas w/ Lime & Chile.

    Orange-Vanilla Margaritas

    by Heather Schmitt-González
    Prep Time: 5-10 minutes
    Cook Time: n/a
    Keywords: beverage oranges alcohol tequila Mexican

    Ingredients (2-4 cocktails)
    • 1 c. tequila
    • 1 c. freshly squeezed orange juice
    • ½ c. Licor 43
    • ¼ c. freshly squeezed lime juice
    • splash of pure vanilla extract
    • simple syrup or agave nectar, optional (to taste)
    extras
    • coarse salt or sugar
    • orange slice or wedge
    • ice
    Instructions
    Combine all of the ingredients for the margarita in a large glass measuring cup (or a pitcher or very large jar). Stir to combine.
    Rub a cut orange or lime wedge around the rim of a glass (or glasses) to wet, then overturn into a small plate filled with salt or sugar to coat.

    Add ice cubes and pour margarita over them. Garnish with an orange wheel or wedge. Enjoy!

    notes:
    I like my margarita less sweet, so I do not use the extra sweetener. Licor 43 adds a bit of sweetness, so I suggest waiting to add any extra until after you've combined the other ingredients and given it a try.
    Powered by Recipage
    What happens when two American girls who are both married to Mexican guys find out that although one of them lives in the U.S. and one of them lives in Mexico, they both love eating the same food?  Well, naturally they decide to get "together" the only way they can and cook up the same dishes.  Or perhaps take the same ingredients and talking about them in their own voice or using them in their own way. 

    Leslie and I have teamed up to occasionally cook/bake/make a our own versions of the same food.  We want to see how similar (or how different) they turn out.  Other times we will pick an ingredient and use it however we choose...or maybe just talk about it.  Good food knows no borders and we hope to share the food we love with you.  It's not a competition, it's a showcase.  We will post on the same day as each other and would love to hear your thoughts on what we've made and how you make it. 

    Join me (here at girlichef) and Leslie in her kitchen (at La Cocina de Leslie) for some delicious food.
    She Made, Ella Hace Banner- girlichef.com and lacocinadeleslie.com
    Sunday, February 17, 2013

    Dark Chocolate-Dipped Apricots

    Dark Chocolate-Dipped Apricots
    Raise your hand if you can't resist those high-quality chocolate bars that are studded with fun, and sometimes unexpected flavors.  Mine is raised.  It's true.  I was seriously contemplating hard... like 10 or 15 minutes hard... in front of a little (big) display of them at the drugstore the other day.  Dark chocolate with chile.  Dark chocolate with candied ginger.  White chocolate with cacao nibs.  White chocolate coconut.  Creamy milk chocolate with almonds and cherries.  It's torture.

    At one point I had three different boxes in my hand.  I also love the fact that they come in boxes that you have to open to get to the fun wrapper inside.  I peel that crinkling wrapping back with all the care of Charlie Bucket, I tell you.

    I wound up putting them all back.  I was like "this is crazy".  Or maybe something more ghetto like "yo, bleep this bleep. I'm out."  Oh yeah.  I'm as ghetto as they come.  I could not decide. And I wasn't going to drop a minimum of $7.50 on chocolate bars.
    dark chocolate
    Although I did wind up passing another one of those evil displays at a different store a few days later.  I zeroed in on the white chocolate with cacao nibs, snatched it from it's shelf, faced forward, and walked away.  All fast like.  I made sure the bag containing that chocolate made its way into the car with me instead in the trunk.

    This has been my idea of dessert and sweets lately.  I've been steering clear of cakes and brownies and cookies and pies.  And indulging in scrumdiddlyumptious squares bars of chocolate instead.  I have a feeling that my cravings for those things will make their way back into my being soon, though.

    Along the same lines of scrummy chocolate studded with goodies are goodies bathed in scrummy chocolate. Like these plump little nuggets of sunshine.  They go swimming in a pool of lightly sweet dark chocolate.  Then they take a roll in salty shards of nuttiness.  As far as desserts go, I consider them virtuous.

    What about you?  Virtuous or not really...

    Dark Chocolate-Dipped Apricots
    Dark Chocolate-Dipped Apricots
    by Heather Schmitt-González
    Prep Time: 15 minutes
    Cook Time: less than 5 minutes
    Keywords: snack dessert vegetarian soy-free apricots chocolate nuts

    Ingredients (3 dozen)
    • ½ c. dark or bittersweet chocolate chips (or equivalent chopped chocolate)
    • 36 dried apricots
    • ~¼ c. finely chopped SALTED pistachios
    Instructions
    Line a baking tray with wax paper (or parchment).

    Place the chocolate in a small glass bowl and microwave for about a minute. Stir with a heat-proof spatula. If not melted all the way, heat in 15 second intervals until smooth.

    Dip the apricot (halfway to three-quarters of the way) into the melted chocolate. Sprinkle or gently dip one side into the chopped pistachios, then set on wax paper, nut side down; sprinkle pistachios on top. Repeat with all of the apricots.

    If you like, slide the tray into the refrigerator for 30 minutes or so - the chocolate will harden quickly this way.

    notes:
    Once the chocolate has set, these can be stored in an airtight container at room temperature for up to 3 days.
    If you want a thicker coating of chocolate, slide into the fridge after the first dip (leaving off the nuts). Once hardened, dip into the chocolate another time and then finish as written. And yes, you will probably need more chocolate than listed if you do this.

    adapted from Eating Well
    Dark Chocolate-Dipped Apricots
    Oh, and post script - if you like these, you'll probably also like Alyssa's Chocolate Covered Apricots w/ Crushed Almonds. I know I want some hanging out side-by-side with these little bites. They'd be besties.
    Saturday, February 16, 2013

    Assyrian Spinach Pies {Bread Baking Babes}

    The Babes are back!  And this month we're bringing you some tasty little pockets of fragrant bread stuffed with a mixture of spinach, walnuts, feta cheese, lemon, and pomegranate arils (well, mine don't have pom arils because poms have made themselves scarce around here as of late).  Tell me that doesn't make your mouth water just thinking about it!

    Plus, this is an extra special month, because it commemorates the 5th year anniversary of the Bread Baking Babes - way to go Babes!  Babe Tanna is our host kitchen of the month for this event, and she has chosen a delicious way to celebrate by bringing these Assyrian Spinach Pies into our kitchens.

    The thing that intrigued me most about this recipe was the ground mahlab in the dough - something I had never heard of before.  It is made from the pits of sour black cherries, and it lends a lightly fragrant note to the dough that is both present and barely noticeable.  At the same time.  Strange, huh?  It's like, you probably wouldn't realize anything was missing if you made the dough without it - and it would still work.  But once you have actually  made the dough and included it, you couldn't imagine it without mahlab.  Does that make any kind of sense?

    My first obstacle was the inability to find any pomegranates around here anymore.  They are out in full-force at Christmastime, but then they peter off and disappear entirely by the beginning of February.  Okay, I'll admit, I found two sad and withered ones.  But I was highly skeptical that the arils held any juice anymore, so I decided to pass.  Instead I wanted to substitute dried, tart cherries to echo the mahlab in the dough.  I didn't realize until I was putting the filling together than I had already eaten most of the package that I had, so I supplemented them with dried cranberries.  Hey, all three are red, tart-ish fruits - it worked.
    My second obstacle was time.  Well, sort of.  I had the time.  I should say that my second obstacle was gas.  In the car.  I ran out of it.  Long story short, our gas gauge is broken, so I set the "trip counter" and count miles until I need to stop at the gas station.  Apparently with the cold weather and the need to warm the car up often, I misjudged a bit.  And ran out of gas.

    I had my morning all planned out.  I would get the dough together, knead it, and set it in the bowl to rise.  While it was rising, I would run to the store - on the opposite side of town (but I could make it, I know how long it all takes) - to pick up something that I had on hold.  I ran into a bit of a time-suck at the store when they couldn't find my hold.  Of course.  That's just my luck.  But they were great.  They wound up giving me a discount for the trouble.  And I didn't even ask them to.  So not really a bad thing.

    I still had time to get home before my dough was done rising.  Until I ran out of gas.  Nowhere near a gas station, mind you.  Thank gawd I didn't forget my phone that day.  So, two calls (one to the hubs at work to get him to bring me some gas, one to Natashya to marvel at how dorky I was)...a bit of confirmation that there are still good people in the world (thanks to the kind lady who stopped to make sure I was okay and had a cell phone)...and 45 minutes later, I was back on track.

    My dough had risen for an extra 45 minutes - but it didn't seem to matter.  Phew!  It was beautiful and silky and pliable.  Yay!  (Ummmm...that was my "long story short".)

    So really what I'm trying to say is - this dough is very forgiving.  And it tastes good.  And you should totally make it.  The end.

    Assyrian Spinach Pies

    by Heather Schmitt-González
    Prep Time: 2½ - 3 hours
    Cook Time: 25-30 minutes
    Keywords: bake bread entree vegetarian spinach nuts cheese Middle Eastern

    Ingredients (12 pies)
      dough
      • 1½ tsp. active dry yeast
      • 1 c. warm water (105°-115° F)
      • ½ tsp. ground mahlab (made from the pits of sour black cherries)
      • 1½ Tbs. ground flax seed
      • 2½ c. unbleached all-purpose flour + more as needed
      • 1 Tbs. sugar
      • 1 tsp. salt
      • 1½ Tbs. + 1 tsp. olive oil
      filling
      • ¼ c. extra-virgin olive oil
      • 1 small yellow onion, chopped
      • ½ lb. baby spinach, coarsely chopped
      • ½ c. (~2 oz.) chopped walnuts, toasted
      • ¼ c. dried cherries, chopped a bit (or Pomegranate arils or dried cranberries)
      • ~4 oz. crumbled feta cheese
      • juice & zest of 1 lemon
      • ½ tsp. freshly ground black pepper
      extras
      • cooking spray (or olive oil or melted butter)
      • Plain yogurt, to serve
      Instructions
      making the dough:
      Sprinkle the yeast over ¼ cup of the warm water; add ground mahlab and stir well. Let stand until yeast is creamy, 5-10 minutes.

      Combine flour, sugar, and salt in a large mixing bowl. Add remaining water, olive oil, and dissolved yeast. Stir with a wooden spoon until dough comes together into a mass. Let stand 5 minutes.

      Turn out onto a lightly floured work surface and knead until smooth and elastic, 8-10 minutes. Dough should be soft and slightly tacky. (You can also knead in a stand mixer or in a bread machine.) Form dough into a ball and place into a lightly oiled bowl. Cover with plastic wrap or a clean kitchen towel and let sit at room temperature until doubled in size, ~1 hour.

      Turn dough out onto a lightly floured work surface and divide into 12 even pieces. Shape into balls and set on floured work surface. Drape a clean kitchen towel or plastic wrap lightly over the dough balls and let rest for 30 minutes (to make dough easier to roll).
      prepare the filling:
      Heat ~1 tablespoon of the olive oil in a medium skillet over medium heat. Add onion and sauté, stirring from time to time, until golden and tender, 6-8 minutes. Add spinach and saute for just a minute or two until it just begins to wilt. Set aside off of heat.

      Place the mixture in a large bowl, add walnuts, cherries (or whichever fruit you're using), feta, lemon juice and zest, and remaining olive oil; toss to combine. Taste and adjust seasoning (probably just pepper as the feta is fairly salty).

      Preheat oven to 375°F. Line a baking sheet (or two) with parchment, foil, or a silpat.

      shaping the pies:
      Working one at a time, roll a dough ball into a 6-inch circle with a rolling pin on a lightly floured surface. Place ⅓ c. of filling in the center of the circle, leaving an inch or so of dough exposed. Lightly brush the exposed edges with water. Using one hand, lift the dough at the 10 o'clock, 2 o'clock, and 6 o'clock positions to meet in the center. Pinch together the seams firmly to seal (should look like a bit of a raised "Y" when done). Set on prepared baking sheet. Repeat with remaining dough and filling. About 6 pies will fit on an average home baking tray.
      finishing and baking:
      Spray the surface of the pies with a coating of cooking spray (preferably olive oil-style), or else brush with a bit of olive oil or melted butter.

      Bake in preheated oven for 25-30 minutes, or until golden. Serve warm or at room temperature with plain yogurt (the acidity and creaminess of the yogurt compliment the filling in the pies). Add a big salad and you've got yourself a meal.

      notes:
      You can freeze the baked pies once cool on a baking sheet; transfer to zippered freezer bags once completely frozen for up to 1 month. To reheat, thaw in the bag, then set on a baking sheet and slide into an oven that has been preheated to 350°F for ~10 minutes.

      This dough is pretty forgiving. Even after letting it sit an extra 45 minutes in the first rise, it was beautifully silky and workable.

      adapted from A Baker's Odyssey
      Powered by Recipage

      The Bread Baking Babes
      Bake My Day - Karen
      blog from OUR kitchen - Elizabeth
      girlichef  - Heather
      Life's a Feast - Jamie
      Provecho Peru - Gretchen


      If you'd like to bake along as a buddy this month (and celebrate 5 years!), bake up a batch and send them over to Tanna at My Kitchen in Half Cups, our Babe kitchen of the month by the 29th.  She'll send you a badge for baking along and round up all of the entries on her site!

      I am submitting this post to:
      Yeastspotting
      Bake Your Own Bread
      Thursday, February 14, 2013

      El Beso de Luz Margarita + @Casa_Noble Tequila {I'll Drink to That}

      Okay.  So.  Over the years, I've had mixed feelings about Valentine's Day.  Growing up, I loved decorating paper lunch sacks with cut-out hearts of all shapes, sizes, and colors.  I loved taping it to the side of my desk and hoping it would fill up nicely.  I loved sliding my own Valentine's into other people's bags.  It was fun.

      Fast forward a few years and perspective starts to shift.  Valentine's were a bit more coveted.  I always hoped I wouldn't be the one to get to the end of the school day without a cheesy carnation in my hand.  At least one.  You remember, right?  If it just so happened that you were not "going with" somebody that year, you conspired with your girlfriends to plunk down the couple of dollars it took to send each other a carnation.

      And then there was collage.  Basically, Valentine's Day could come and go and I didn't even realize it.  There was one year when I made a huge batch of THE BEST sugar cookies on the face of the planet.  I cut them out in the shape of hearts.  I topped them with white, pink, and red frosting. And a few sprinkles here and there.  I shared them with cute boys.  This was when we no longer lived in the dorms.  I shared an apartment with three friends (♥ Kel...Bren...Gina - miss u guys).  And then I promptly lost (threw away?) the recipe for those cookies and have regretted it for approximately 16 years since.  I've never made another sugar cookie recipe that good.
      I mean, as I got older, I always thought of it as a "Hallmark Holiday".  But that didn't mean that I didn't want something pretty...or chocolaty...to go along with it.  So, do you know what I did?  Stay with me here, it's a doozy.  I decided that getting married on Valentine's Day was the perfect plan.  We I We would actually have a reason to celebrate LOVE on February 14th.

      Plus, who can forget that date?  I was making it easy on my husband.  Never would he have to scramble to get me a gift or wish me a happy anniversary because he forgot our anniversary until the last minute.  Nope, he'd have constant reminders every time he turned around for at least a month before the date -  and not even from me... from the television and billboards and stores that he would pass by anyway.

      I told you it was a doozy.  Pretty smart though, huh?  Yes, these days I join in the celebration of love not (only) because it's Valentine's Day, but because it is my wedding anniversary.

      Wanna know a sexy way to spend the day?  Or maybe just the evening... or the afternoon... whatever?  Put on some vinyl (record, not pants please) and sip a margarita.  Preferably a little Santana.  On both fronts.  Santana album.  Carlos Santana tequila.

      El Beso de Luz Margarita (Kiss of Light Margarita)

      by Heather Schmitt-González
      Prep Time: 5 minutes
      Cook Time: n/a
      Keywords: beverage alcohol blood orange orange tequila Mexican

      Ingredients (1 cocktail)
      Instructions
      Combine Casa Noble Crystal Tequila, Licor 43, and lime juice in a cocktail shaker with an ice cube. Shake vigorously.

      Pour into a glass, over ice, if you wish. Squeeze the orange over the top and then drop it into the cocktail. Enjoy.

      This cocktail recipe comes from Casa Noble Tequila and was used with permission.
               "Not only is tequila an aphrodisiac, but Carlos Santana likened his first warm taste of El Beso de Luz to the first time one falls in love. In fact, he was so moved by it that he gave the cocktail its name, a tribute to his wife Cindy."
      Powered by Recipage
      my thoughts...
           -Casa Noble Crystal Tequila: smooth, sexy, very sippable, perfect alone or in a cocktail.  New favorite tequila.
           -Licor 43: slightly sweet with hints of vanilla and citrus.  Loved it.  Need a big bottle.
                                                                                       ...loved both separately and together.


      I received a teeny-tiny sample-size bottle of each Casa Noble Crystal and Licor 43 so that I could try this cocktail. All opinions stated in this post are my own.
      Wednesday, February 13, 2013

      Rožky (Slovak Bread Rolls) {European Culinary ABC's}

      These Slovak Bread Rolls mark the second stop on our European Culinary journey, the Slovak Republic (Slovakia for short).  Slovakia is yet another country that I know absolutely nothing about.  Sadly, I will be saying that a lot over the next year and a half (and 26 European communities).  I love learning about other cultures.  Now.  Back in the day when my brain would have soaked up that information like a sponge, I was less interested.  Sigh.  Why is youth wasted on the young? {wink}

      What I do know about Slovakia?  They were once the other half of Czechoslovakia before their peaceful dissolution in 1992.  They kept the "slovakia" half... and the Czech Republic kept the "czech" half.  Brains.  I got 'em.

      Their cuisine is comparable to (perhaps obviously) that of the Czech Republic, but also that of Austria, Hungary, the Ukraine, and Poland.  Pork, poultry, potatoes, flour, cabbage, and milk are all staples.  Also, thanks to the popularity of hunting and vast forestation, game is also fairly popular.  Traditionally, white, sweeter wines were the most popular, as well as Pilsner beers, but tastes have evolved to include reds, dry wines, and dark lagers today.
      Of all of those traditional influences, I went with perhaps the most basic - flour.  I am not 100% sure if this is true, but I read that Rožky is the most popular form of bread in Slovakia.  The dough is cut into triangles and rolled into a tubular form and curved slightly.  My curves sort of righted themselves in the oven, so you have to look closely.  My shaping can use a bit of work, but these are very simple rolls to make.

      And you know we love our bread in this house.  I love how every country has the same basic bread recipe with the variations coming in size or shape, or perhaps fillings or toppings.  But good bread warms the soul worldwide.

      Rožky (Slovak Bread Rolls)

      by Heather Schmitt-González
      Prep Time: ~3 hours (mostly unattended)
      Cook Time: 15-20 minutes
      Keywords: bake bread Slovak

      Ingredients (16 rolls)
      • ~3½ - 4 c. bread flour
      • 1½ c. milk, lukewarm
      • ¼ c. vegetable oil
      • 2 Tbs. sugar
      • 2 tsp. salt
      • 2¼ tsp. active dry yeast
      optional:
      • water/cream/egg wash
      • seeds (cumin, poppy, sesame)
      • chopped herbs
      Instructions
      Dissolve yeast in milk until frothy. Add to bowl with remaining ingredients (starting with the lesser amount of flour) and stir until combined. Turn out onto a lightly floured work surface and knead until smooth and pliable. Set in an oiled bowl, cover and let rise until doubled in size, ~60 minutes.

      Line one or two baking trays with parchment paper or a silpat (or grease it).

      Divide dough into 4 equal pieces. Keep remaining dough under towel or plastic while working with one piece.
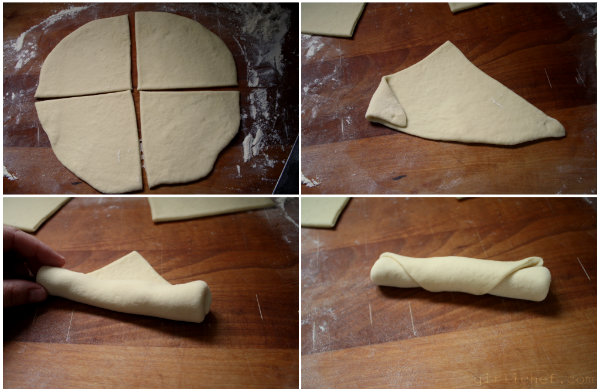
      Roll each portion into a circle ⅛-¼" thick. Cut circle into quarters.

      Grab the points of the long end of each quarter and fold/tuck in. Starting at that long end, roll tightly, securing as you go. Once dough is in a cylinder shape, pinch seams together and curve ever-so-slightly. Set on prepared baking tray(s), seam side down.
      Cover with a clean kitchen towel or plastic wrap and let rise until doubled, ~45-60 minutes.

      Preheat oven to 375° F during last 15 minutes of rise time. If you like, brush top with a bit of water, cream, or egg wash and sprinkle with seeds or herbs.
      Slide into preheated oven and bake for 15-20 minutes, or until golden brown and cooked through.

      adapted from slovak cooking
      Powered by Recipage


      For more information on Slovakia, check out this website - especially the photos, they're gorgeous!

      ABC_CEOur second stop on this European Community Culinary ABC's journey is Slovakia.  Hosting this month is Terry at Crumpets & co. with B is for Bryndzové halušky.  If you'd like to join us on this journey, we'll be in Slovakia until February 17!

      I am also sharing this post with:
      Yeastspotting
      Bake Your Own Bread