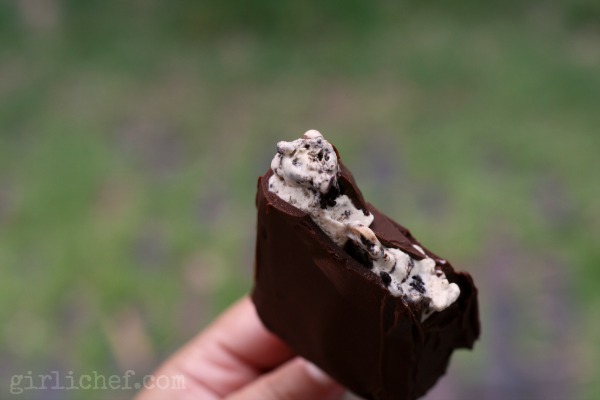
As you can see from the photos, the chocolate coating is way too thick. And I don't know why I did that. I mean, in my mind, I picture that thin, chocolate shell that surrounds the ice cream bars of my childhood. And yet, it's like I was possessed during the dipping process. I went in for a double-dip when I knew deep down that it wasn't necessary. Trust me, it's not necessary. One dip'll do ya!
And looking at these from an experimental point of view, I have to say that they were fairly successful. Especially since earlier that day, I just tried slicing a box of ice cream into rectangles and dipping them in chocolate. They were tasty, but in a totally unsuccessful way. I found that the ice cream just didn't get hard enough that way. Basically, we were eating chocolate shell covered ice cream from a baking tray.
Pretty sure my kids would those some happy mistakes. I'll let you know once I come up with an entirely homemade version, but until then - enjoy these!
(sorta-) Homemade Ice Cream Bars + Magic Shell
by
Prep Time: 6-8 hours (mostly unattended)
Cook Time: n/a
Keywords: dessert chocolate frozen popsicles summer
Ingredients (4 (3 ounce) Ice Cream Bars)
- 8 ounces ice cream (any flavor)
- 1/2 cup (4 fluid ounces) heavy cream
- 8 ounces chocolate, chopped (bittersweet, dark, milk, white)
- 1/4 cup (2 ounces) coconut oil
Instructions
to make the inner ice cream bar:
Whisk together the ice cream and heavy cream until they are smooth; chunks of cookie, candy, whatever are fine depending on what flavor of ice cream you chose, it's the mixture they're suspended in that should be smooth.
Divide mixture evenly into ice pop molds and freeze until solid, about 4 hours, adding wooden sticks at the correct time for your particular molds (I usually do this after 1 hour).
Combine chocolate and coconut oil in a small bowl and microwave for 1 minute. Remove from microwave and whisk together. Mixture should be smooth and melted entirely...if it's not, return to microwave for another fifteen seconds. Set aside and allow to cool to room temperature.
Remove the frozen ice cream bars from their molds (run mold under hot water until just loose enough to pull out. Set on a wax or parchment paper lined sheet and freeze for 20-30 minutes, or until the outsides have again frozen completely.
Working quickly, grab each ice cream bar by the stick and dip each side and top into the room temperature Magic Shell coating. Set back onto the lined tray and freeze for 1-2 hours. The longer they stay in the freezer, the easier they will be to eat (soft ice cream centers make it messier...I know from experience).
The Magic Shell coating can be transferred to a squeeze bottle once it cools to room temperature. Just be sure it is capped (and then continue to store at room temperature). Squeeze it over ice cream and watch it harden into that magical shell coating you remember from your childhood. There are just some things that we never grow out of!
Powered by Recipage
- Blog about your chocolate treat. Your recipe must include the two ingredients chosen for the month. It can be a simple no bake treat or a sophisticated layer cake, the complexity level of the recipe is totally up to you.
- Include a link back to the Chocolate Party page. Optionally, add the Chocolate Party logo in your blog post or on your sidebar.
- Your recipe must be published during the current month. Please do not link old recipes, they will be deleted.


