Peot's books include The Successful Artist's Career Guide, Alternative Art Journals, Make Your Mark and the award-winning Inkblot: Drip, Splat and Squish Your Way to Creativity, plus the release of two new publications this year, Crow Makes a Friend and today's feature, Stencil Craft!
Today Margaret is showing us how she makes Stencil Printed Tea Towels and Crates for culinary gift giving, a project that I plan on putting to use many times in the near future. Welcome Margaret!
 |
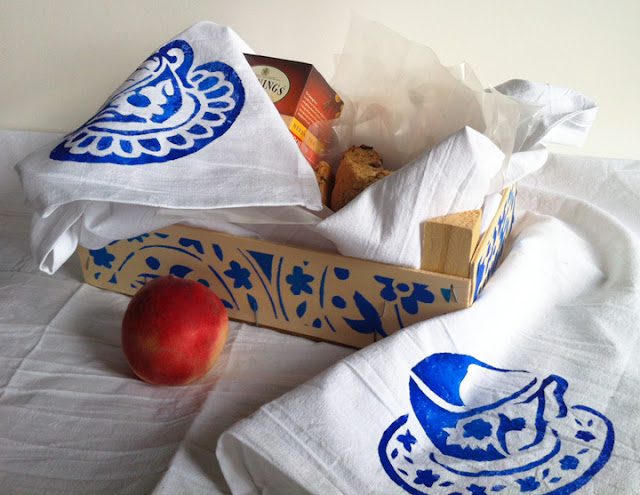
| Stenciled tea towels in a stenciled clementine crate make a fun holder for a gift of yummy scones and tea. |
Getting out of the City in the summer is a blessing, and makes for a lot of pleasant house parties upstate and on Long Island. A host/ess gift that is always appreciated is a present of hand-stenciled tea towels. I have printed birds on tea towels, paw prints, cupcakes and even lizards. But this summer, I am thinking that a gift basket of a couple of tea towels, printed with teacups, tucked around scones and a box of tea would be a really fun gift—not only to give, but to put together!
Tea towels can be purchased from Dharma Trading and various craft sites on line, even from Amazon. They are sometimes called “flour sack” towels. These towels are usually a little larger than a regular dish towel, and have a handy hanging loop on one corner. I like to stencil my image on the corner opposite the loop.
You will need:
Stencil mylar or acetate
Tea towels
Pencil
Copy paper
Stencil burner and glass, or a sharp craft knife
Liquitex acrylic paint
Stiff brush
Tape or Spraymount
I do a loose drawing of a tea cup on a piece of copy paper to get an idea of scale, then refine my drawing when I trace it onto the stencil mylar. When you translate your cup drawing into a stencil, you have to make sure to leave bridges to hold the middle of your design in.
I used a stencil burner to cut this stencil, but you could also use a craft knife on a self healing cutting mat, or even a pair of scissors if your design was fairly simple.
Liquitex acrylic works great for painting on fabric as it doesn’t need to be heatset. Keep in mind that it will be a little stiff. This won’t matter so much if you are painting a cup on the corner and perhaps a taped off border, but if you are going to print an all over pattern, you might consider a textile paint, and heatset according to manufacturer’s instructions. Tape the stencil in place or spray the back with Spraymount and press in place. Paint through the stencil with a stiff brush, brushing away from the edges of the stencil.
Lift, and voila!
Now you can paint as many as you like, with as many designs as please you for gifts, or for use in your own kitchen.
If you enjoyed this stencil craft project, you can find it and so many more in the newly released Stencil Craft—order your own copy from Amazon by clicking here! Connect with Margaret Peot on her website and on her blog, The Inkblot Book, as well as on Twitter, Facebook, and Pinterest. Follow the TLC Book Tour for more guest posts, Q&A's, and reviews of Stencil Craft!
But wait, there's more! Peot is offering up a really cool giveaway (open to residents of the US only) as part of the Stencil Craft book tour. If this isn't inspiration to get crafty, I don't know what is. Here's what's included:
- 17" x 15" canvas tote hand printed with a stencil interpretation Vermeer's Girl with a Pearl Earring
- A signed copy of STENCIL CRAFT: TECHNIQUES FOR FASHION, ART AND HOME
- 1 blank 12" x 12" canvas tote
- 1 10" x 14" piece of stencil Mylar
- 1 sponge
- 2 stencil brushes
- 1 craft knife set
- 2 Metallic Lumiere Acrylic Paints, Indigo and Metallic Copper
a Rafflecopter giveaway


