posts may contain Amazon affiliate links, which earn me a small commission when you buy (but doesn't cost you anything extra). Occasionally I receive free products and/or run sponsored posts—this will always be stated clearly in the post. Thank you for supporting this blog.

This website contains some quotations, excerpts, and screen clips from copyrighted material. These uses fall well within the copyright doctrine of "Fair Use".
Saturday, October 31, 2015

Libre Tea Glass: feature + discount code

Libre Tea Glass feature and discount
[sponsored conversation]

Most of us want to lead healthy, active lives and inspire our families and friends; now we can enjoy a tea moment anywhere anytime with the stylish and convenient solution for teas, herbs, and fruit infusions on-the-go.

The Libre tea glass is a pretty and practical choice for convenient leaf tea on-the-go. Its removable filter keeps all the leaves, or the bag, in the glass away from your mouth; also great for fruits or soothing herbal elixirs. You can create your own flavorful beverage and enjoy. Wonderful herbal teas are a great way to wind down at the end of a long day. The "how to" video (at the bottom of this article) shows three ways that you can use the Libre tea glass.

The 100% BPA free Libre tea glasses keep drinks hot or cold, are durable, and ensure a fresh taste every time due to their easy-wash glass interior - it's the only to go thermos you'll need at the soccer field, yoga class, on a hike, the morning dog walk, or curled up on the couch. We love to inspire tea moments anywhere, anytime - take a sip, watch your tea leaves dance, and enjoy relaxing tea moment for yourself.

This holiday, give your friends and family an inspired and unique gift you can use all year round. Choose from their Classic Collection - sophisticated metal trim with gold detailed lids, or their Libre Life Collection. They have great deals on 6-piece Holiday Gift Paks for all the tea lovers on your list. My readers get to save (great for holiday gifts, calm moments, and traveling)!

Get 10% off until November 15, 2015 by placing your order HERE and using code: USAMoms10.


Friday, October 30, 2015

25 Pies for your Thanksgiving Table

25 Pies for your Thanksgiving Table
I have a very special treat for today's edition of #FridayPieDay—a Thanksgiving inspired roundup featuring 25 pies that would be perfect for eating alongside coffee after the big meal this year! Thanksgiving just so happens to be my favorite "food day" of the entire year. I spend at leas) an entire month pouring over books and magazines (old and new) with a Thanksgiving theme planning out my menu for the year.

This year I thought it would be fun to help other Thanksgiving feast lovers out there do the same. Starting today and lasting throughout the month of November leading up the big Thursday, I've got a whole lot of roundups like this one. Each roundup will feature 25 ideas for one aspect of the big meal, be it the turkey, the sweet potatoes, the vegetable side dishes, or the bread and rolls. I'll even share ideas for desserts beyond pie and mains beyond turkey...in case you (unlike me) tire of the American turkey and pie tradition.

What better way to kick of the Thanksgiving planning than with pie? Go ahead, put on your menu planning hat—it's time to get started!
Chocolate Lovers Pecan Pie by Floating Kitchen

Amish Peanut Butter Pie from Nutmeg Nanny
Apple Cider Pie
Apple Hand Pies from Cooking on the Front Burner
Blue Ribbon Coffee-Toffee Pecan Pie from Shockingly Delicious
Bourbon Pumpkin Pie with Salted Brown Butter Pecan Streusel from Sweet Peas and Saffron

Date Crumb Pie
Date Crumb Pie

Caramel Apple Slab Pie from Eazy Peazy Mealz
Chocolate Lovers Pecan Pie from Floating Kitchen (pictured)
Coconut Sweet Potato Pie with Spiced Graham Cracker Crust
Cranberry Pecan Pie from Barbara Bakes
Dad's Sweet Potato Pie from Joy the Baker

Fluffy Pumpkin Pie by Bake Love Give

Date Crumb Pie (pictured)
Fluffy Pumpkin Pie from Bake Love Give (pictured)
Low-Sugar Pumpkin Cheesecake Pie from Kalyn's Kitchen
Maple Pumpkin Pie from Hoosier Homemade
Mini Deep Dish Pumpkin Pies from Chocolate Moosey

Roasted Butternut Squash Pie with Brown Sugar Marshmallow Topping by Keep It Sweet Desserts

Mom's Apple Pie from Tried and Tasty
Pumpkin Biscoff Mousse Pie from Frugal Foodie Mama
Pumpkin Pie with Sesame Snaps
Purple Sweet Potato Pie from It's Yummi
Roasted Butternut Squash Pie with Brown Sugar Marshmallow Topping from Keep It Sweet Desserts (pictured)

Sour Cherry Apple Pie with Cheddar Cheese Crust by Hola Jalapeño

Sister Schubert's Sweet Potato Pie from The Kitchen is My Playground
Sour Cherry Apple Pie with Cheddar Cheese Crust from Hola Jalapeño (pictured)
Spiced Maple Pecan Pie with Star Anise
Turtle Pecan Pie from Growing Up Gabel
Whiskey Caramel Apple Pie

Find more pie ideas for Thanksgiving on my Thanksgiving Food and Inspiration Pinterest board!


#fridaypieday at allroadsleadtothe.kitchen - sharing pie on the last Friday of every month.
Grab a plate and a fork, it's time for PIE! Pull a chair up to the table and help me dive deeper into the wonderful world of pie; from fruit pies to nut pies to cream pies to icebox pies and beyond...to savory pot pies and skillet pies. Whether it's a traditional round pie, a slab pie, or even a hand pie—it's going to be all about the pie.

Join me on the last Friday of each month for pie and crust recipes, techniques, tools of the trade, and other inspiration. For more information and recipes, please check out my #FRIDAYPIEDAY page!

In true #FridayPieDay form, I have a couple of friends joining me today...and hey, pie is always better when shared, so please check out Stacy's Blueberry Pie with Polenta Shortcake Crust at Food Lust People Love and Kimberly's Twin Peaks "Sweet-Tart" Pie (aka Double Fruit Pie) at Coffee and Casseroles!

Find even MORE great pie recipes for Thanksgiving (and beyond) on my FridayPieDay Pinterest Board!


Fresh Baked Apple Pie on Natural Wood Background photo (in lead photo) via Shutterstock
Wednesday, October 28, 2015

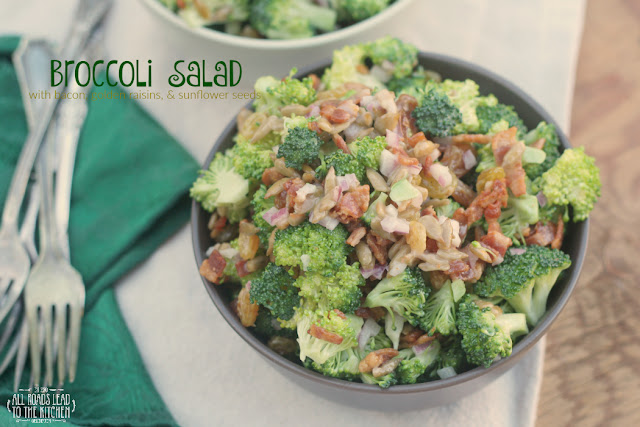
Broccoli Salad with Bacon, Golden Raisins, & Sunflower Seeds

Broccoli Salad with Bacon, Golden Raisins, & Sunflower Seeds
This is one of those classic salads that everybody and their mother has a recipe for. They're all basically the same, but with little personal touches. It's actually not something I grew up with. I got a recipe from a co-worker when I did a brief stint selling motorhome windshields just out of college (no, that's not a joke - I even met Arlo Guthrie when his tour bus windshield cracked and he stopped in to get a new one).

We used to have certain days of the month where we'd bring in food, potluck-style, and a girl I worked with brought in a broccoli salad. Like most people, I was smitten. She wrote the recipe out neatly (and misspelled - "Brocolli Salad") on a pink index card that I still have today. Originally I made it exactly as written. My family started to not only look forward to it but to expect it on the table at our extended-family holiday meals.
Broccoli Salad with Bacon, Golden Raisins, & Sunflower Seeds
Over the years, I've tweaked that original recipe a bit by reducing the sugar, changing the color of raisins that I prefer in it, upping the amount of bacon (duh!), and adding sunflower seeds. As written today, this is pretty much my personal favorite version of this salad...although I'd happily eat your favorite version as well.

Broccoli Salad
Tiny broccoli florets, bacon, golden raisins, sunflower seeds, and red onion are folded together with a sweet and tangy dressing in this classic salad.
Print Friendly and PDF
Broccoli Salad with Bacon, Golden Raisins, & Sunflower Seeds
by Heather Schmitt-Gonzalez
Prep Time: 20 minutes
Cook Time: 10 minutes
Keywords: side bacon broccoli American

Ingredients (serves 8-10)
  • 1 pound bacon
  • 1/2 cup mayonnaise
  • 2 tablespoons granulated sugar
  • 1 tablespoon white wine vinegar
  • pinch of fine sea salt
  • freshly ground black pepper
  • 2 large broccoli crowns
  • 3/4 cup golden raisins (or a mix of colors)
  • 1/2 cup sunflower seeds
  • 1/2 cup finely diced red onion
Instructions
Cut the bacon into small strips (or dice if slab). Cook until crisp, drain the grease off, and set the bacon aside.

In the meantime, stir the mayonnaise, sugar, vinegar, salt, and several grates of black pepper into a bowl until smooth. Allow to sit for 15 minutes.

Cut the broccoli into very small florets (reserve stalks for another use) and put into a large bowl; you should have about 6 cups of tiny florets. Add the raisins, sunflower seeds, onion, and reserved bacon to the bowl and toss everything together.

Drizzle the dressing over the salad, then use a rubber spatula or spoon to turn and mix until everything is coated evenly in the dressing.

Cover and refrigerate for at least 1 hour, or up to 24 hours before serving.

Notes:
If you don't have White Wine Vinegar, you can substitute plain white vinegar, cider vinegar, or champagne vinegar
Broccoli Salad with Bacon, Golden Raisins, & Sunflower Seeds

Broccoli Salad
Tuesday, October 27, 2015

Save on a new ECOCENTRIC MOM Box Subscription!

Save on a new ECOCENTRIC MOM Box Subscription

[sponsored conversation]

Ecocentric Mom is a subscription box discovery service created just for moms. As a mom-owned business, we know how busy you are. As much as you care, you don't have time to research and shop for the healthiest and best products for yourself and your family. Each month, we will introduce you to brands and products that we know use only the best ingredients and none of the worst. You'll receive home care items, kid-friendly snacks, wellness and green beauty items that we think are both useful and fun. Plus, every box has a "keeper" item that you will use again and again rather than 'use up'- what's more eco than that?

Subscribers choose between the pregnancy, mom & baby, and mom subscription box, and switch to the next box when they are ready. The pregnancy box features pregnancy care items, as well as items to help you prep for the big arrival - and doesn't contain anything that is potentially harmful to your growing bump. The mom and baby box includes goodies for the new mom and her little, and is a great solution to navigate the demands new mommyhood from your sleep-deprived fog. The mom box is mostly about pampering you, mom, and a little bit about helping you pamper your family.

Save on a new ECOCENTRIC MOM Box Subscription
Your Ecocentric Mom subscription is about more than helping you be "green" or be a mom - it's about making you feel special each month. We think it's time someone takes care of mom for a change!

My readers get to save! New subscribers will receive a 3-month subscription for $50 using code: USFamily! 

Click HERE to subscribe.

Check out my review of the Ecocentric Mom "Mom" Subscription Box HERE!

Pumpkin Cheesecake w/ Gingersnap Crust

Pumpkin Cheesecake with Gingersnap Crust
You know how time flies, right? One holiday sneaks up on you, then you blink and another one is right in your face. Well, this month I'm prepared. I'm grabbing Thanksgiving by the horns and wrangling it in. Starting November 1, I'll be sharing recipes and roundups featuring recipes fit for Thanksgiving all month long...because Thanksgiving is my favorite food-day of the entire year!

Why mention that now when it's still October? Well, I'm taking advantage of this month's pumpkin theme for Progressive Eats to get a head start on November. Thanksgiving and pie go hand in hand, and traditionally it's always been pecan and pumpkin pies in my family. When I got older and started making my own pies, I started adding another one or two to the mix every year.
Pumpkin Cheesecake with Gingersnap Crust
Well, this may be the year that I add a cheesecake to the mix. I decided to bake this last week and test it out on my extended family last week at my grandpa's 90th birthday celebration. Let's just say that I didn't bring a single piece home. The rich, creamy, lightly spiced cheesecake filling sits perfectly atop a spicy gingerbread crust and is adorned with crunchy bits of candied pecans.

I know this is practically sacrilege, but it's almost like Pumpkin Pie Plus. It tastes an awful lot like pumpkin pie...but richer and creamier. And you'll have to check back with me on this (once I've eaten it a couple more times), but it wind up replacing pumpkin pie altogether on our Thanksgiving tables of the future.

Pumpkin Cheesecake w/ Gingersnap Crust
This spiced pumpkin cheesecake that sits between a gingerbread crust and a layer of candied pecans is a delicious alternative to pie this Thanksgiving.
Print Friendly and PDF
Pumpkin Cheesecake with Gingersnap Crust
by Heather Schmitt-Gonzalez
Prep Time: 20 minutes
Cook Time: 45 minutes
Keywords: bake dessert vegetarian soy-free Thanksgiving American fall winter

Ingredients (serves 10-12)
    for the crust:
    • 4 ounces gingersnaps
    • 1.5 ounces (1/3 cup) pecan halves
    • 2 ounces (1/4 cup firmly packed) brown sugar
    • 2 ounces (4 tablespoons) unsalted butter, melted
    for the filling:
    • 16 ounces cream cheese, at soft room temperature
    • 8 ounces (1 cup) pumpkin puree
    • 3 large eggs, at room temperature
    • 6 ounces (3/4 cup firmly packed) brown sugar
    • 1 teaspoon ground cinnamon
    • 1/4 teaspoon ground allspice
    • 1/4 teaspoon ground ginger
    • 1/4 teaspoon ground cloves
    • pinch of fine sea salt
    for the topping:
    • 2 ounces (1/2 cup) pecan halves
    • 1 1/2 tablespoons unsalted butter
    • 2 tablespoons granulated sugar
    • pinch of fine sea salt
    Instructions
    Make the crust:
    Lightly butter a 9-inch springform pan. Combine gingersnaps and pecans in the bowl of a food processor and pulse until crumbly. Add the brown sugar and melted butter and pulse a few times until it is the texture of wet sand.

    Pour the crumbs into the springform pan and use your fingers to pan the mixture into the bottom and about 1-2 inches up the sides of the pan as evenly as you can get it. Refrigerate for at least 20 minutes.

    Preheat oven to 350° F. Line a baking sheet with foil and set aside.

    Make the filling:
    Rinse and dry the bowl for the food processor. Add all of the ingredients for the filling to the bowl and puree until very smooth, using a rubber spatula to scrape down the sides if needed. Pour and scrape the filling into the chilled crust, smoothing the top.

    Set the whole thing onto the prepared baking sheet and slide into preheated oven. Bake until the cheesecake is set and a thin-bladed paring knife inserted in the center comes out clean, about 45 minutes.

    Let cool completely on a wire rack, removing the outside of the springform pan once you see the sides pull away. You can run a thin-bladed knife around the edge to be sure that nothing sticks first. Wrap and refrigerate until ready to serve.

    Make the topping:
    Set aside 10 pecan halves; finely chop the rest. Heat the butter in a small pan over medium-high heat. Once melted, add the pecans and sprinkle the sugar and a pinch of salt over them. Cook, stirring, until the sugar melts and the nuts are toasted and covered in caramel.

    Transfer to a piece of parchment paper and allow to cool completely. If it sticks together in large clumps, just use a sharp knife to chop it back up into fine pieces.

    Just before serving, sprinkle the candied pecans evenly over the top of the cheesecake and arrange the extra pecan halves evenly around the perimeter.

    Pumpkin Cheesecake with Gingersnap Crust

    Welcome to Progressive Eats, our virtual version of a Progressive Dinner Party. This month's theme is all about Pumpkin and is hosted by Jeanette Chen who blogs at Jeanette’s Healthy Living. With Autumn’s arrival, it’s the perfect time to start using fall’s harvest in our menus. We have some great ideas this month to use pumpkins in all sorts of dishes, both Savory and Sweet.

    If you're unfamiliar with the concept, a progressive dinner involves going from house to house, enjoying a different course at each location. With Progressive Eats, a theme is chosen each month, members share recipes suitable for a delicious meal or party, and you can hop from blog to blog to check them out.

    Savory

    Sweet

    We have a core group of 12 bloggers, but we will always need substitutes and if there is enough interest would consider additional groups. To see our upcoming themes and how you can participate, please check out the schedule at Creative Culinary or contact Barb for more information.
    Sunday, October 25, 2015

    Zombie Finger Cookies inspired by Hocus Pocus #FoodnFlix

    Zombie Finger Cookies
    This month for Food 'n Flix, we are watching the 1993 family Halloween flick, Hocus Pocus. I didn't see Hocus Pocus when it originally came out. I'm guessing that's because that was the year I graduated from high school and started college, so it probably wasn't even a blip on my radar at that point. I have caught it on t.v. quite a few times over the (22!) years since, though. But I think this may be the first time I've ever really sat down and watched it with intent.

    It's definitely a cute movie for the season. Bette Midler is fantastic because...well...she is Bette Midler. Sarah Jessica Parker is an all-out goofball, but a lovable one. But my favorite characters are probably an adorably young Thora Birch as Dani and Doug Jones (Hell Boy, Falling Skies) as the lovable zombie Billy Butcherson.

    In true 90's fashion there are plenty of stereotypes represented in the film: stupid bullies, the new kid in town with a younger sibling who falls for the pretty girl, a talking black cat, aloof parents, and witches with flying broomsticks (and mops and vacuum cleaners...). But personally, I'm always in the mood for cheese, so I'm okay with it.
    Zombie Finger Cookies inspired by Hocus Pocus #FoodnFlix
    There aren't a whole lot of food-centered scenes, though. You see pumpkins, a jello mold, cheese puffs, and plenty of Halloween candy. There's mention of Mummy Scorpion Pie and Scrod (fish) in breadcrumbs and olive oil. I thought a "witches brew" sort of drink served in a bubbling cauldron could be a fun thing to make, as a nod to the sisters' cauldron.

    Billy Butcherson loses his fingers
    Ultimately, I chose a scene with the resident zombie, Billy. Billy follows the kids through an underground tunnel in which he has to lift a manhole cover to climb out of. As he looks around with the cover still held up, he hears a motorcycle coming, and as to quickly duck back underground. Well, all of his fingers don't quite make it—they're severed as the manhole cover bangs shut on top of his hand, leaving zombie fingers sitting in the road. This scene (just over 50 minutes into the movie) is the inspiration behind my zombie finger cookies!

    You'll often see witches fingers cookies this time of year, and I went into the process with those in mind. I used a fairly basic spritz cookie recipe (the kind you see during the Christmas season a lot) as the base. I wanted to tint it green in honor of Billy's lovely coloring and decided that adding some Matcha to the dough was the way to go. Witches fingers often use almonds as the nail, but I wanted a more craggy, rotting and broken sort of look, so I chose to use pistachios instead. I was pretty pleased with myself because they turned out just as I'd imagined them.

    Find more zombie-inspired recipes here!

    Zombie Finger Cookies
    These rich, buttery cookies with a hint of matcha are shaped like severed zombie fingers to delight kids of all ages during the Halloween season!
    Print Friendly and PDF
    Zombie Finger Cookies
    by Heather Schmitt-Gonzalez
    Prep Time: 30 minutes (active) + 60 minutes (inactive)
    Cook Time: 14-16 minutes
    Keywords: bake dessert vegetarian soy-free matcha pistachios Halloween cookie American fall

    Ingredients (3 dozen)
    • 1/2 cup (1 stick / 8 tablespoons) unsalted butter, at soft room temperature
    • 1/2 cup powdered sugar
    • 1 large egg
    • 1/2 teaspoon almond extract
    • 1/2 teaspoon pure vanilla extract
    • 1 1/4 cups + 1 tablespoon all-purpose flour
    • 1 tablespoon Matcha green tea powder
    • 1/2 teaspoon baking powder
    • 1/4 teaspoon fine sea salt
    • 18 pistachios, cut in half the short way (it's good that they look craggy and broken)
    • 2 tablespoons seedless strawberry or raspberry spread, preserves, or jam
    Instructions
    Beat the butter, sugar, egg, almond and vanilla extracts together in a medium mixing bowl until light and creamy. Combine the flour, matcha, baking powder, and salt in a small bowl, then gradually add it to the wet mixture, beating as you go. Cover bowl and refrigerate for 1 hour before using.

    Preheat the oven to 325° F. Line two baking sheets with parchment paper. Lay a piece of wax paper on your work surface (this is essential as the dough is sticky to work with once it touches the heat of your hands).

    Remove dough from the fridge. Spray a 1 teaspoon measuring with nonstick spray, then scoop out a slightly heaping teaspoon of dough onto your wax paper. Use your wax paper to roll the dough into a thin finger-like log.

    Press one half of a pistachio into one tip of the log to make a fingernail; press dough around nail a bit to make it look more lifelike. Use a sharp, thin-bladed paring knife to cut a few thin lines in the place where the knuckles would be. Squeeze the dough a bit between the knuckle lines to make them jut out a bit. Transfer finger to prepared baking sheet. Repeat until all the dough and pistachios are used up. When lining up the fingers, leave at least an inch between each finger because they puff as they bake.
    forming the dough for zombie finger cookies
    Slide trays into preheated oven and bake until the cookies have just started to turn golden at the edges, 14 to 16 minutes. If you're baking both trays at once, switch them from top to bottom and front to back halfway through cooking.

    Scoop the fruit spread into a small baggie and cut off a tip from one of the corners. While the cookies are still warm, squeeze a thin line of fruit spread all around each fingernail; it's okay if it's a bit messy. It should just give it a sort of "light blood" appearance.

    Enjoy immediately or store cooled cookies in an airtight container for up to 2 days.
    Zombie Finger Cookies
    Food 'n Flix Club LogoThis month's edition of Food 'n Flix is being hosted by Elizabeth at The Lawyer's Cookbook with her timely pick, Hocus Pocus! Submissions are due on October 29th, so if you want to join us this month, you still have a few days to get your Hocus Pocus-inspired food or drink up on your blog.

    Also join us next month as we watch The Hundred-Foot Journey, hosted by Camilla at Culinary Adventures with Camilla.

    Thursday, October 22, 2015

    Chicken, Sausage, and Shrimp Gumbo inspired by That Would Be Me

    I participated in the That Would Be Me album review program as a member of One2One Network. I was provided an album to review but all opinions are my own.
    Chicken, Sausage, and Shrimp Gumbo
    It's been a while since I've brought you some music-inspired eats, so I'm pretty excited to share this Harry Connick Jr. inspired gumbo with you today! Recently I was offered the chance to preview Harry's new album That Would Be Me (which is officially released tomorrow!). I'm a longtime fan of HCJ...I mean—come on! He's a singer, musician, actor, performer, composer, arranger, songwriter, bandleader, judge...and he's just as easy on the eyes as he is the ears.

    The overall vibe of this album is mellow and easy to listen to, but I love that there are bits of jazz, soul, funk, and gospel interwoven throughout. I probably listened to the entire album 10 to 15 times over the last 5 or 6 days. At first it was with focus on the lyrics and song titles, but after a while it became the perfect backdrop to cooking, cleaning, writing, and doing the dishes. Like I said, it's mellow, but I also found myself shakin' my bum and bopping my head as I worked.
    Harry Connick Jr - That Would Be Me Album Cover
    The top three songs for me on this album are listed below, with the reasons I like them.

         1. (I Do) Like We Do - classic head-bopping, body-moving "you + me" song (aka a love song in a perfectly wonderful sappy-yet-not-sappy fashion). Loving that's it's jazzy with some horns.

         2. (I Like It When You) Smile - upbeat, happy, jazzy, hand clapping, and a little HCJ scat-rap! It just makes you want to move.

         3. Right Where It Hurts - a little more N'awlins jazz feel than anything else on the album, again with horns and some gospel-style vocals and hand clapping.

    If I had to pick a number 4, it would be Where Prisoners Drown - it feels a bit like "revival" music.

    And while it didn't make my top 4, I totally found myself singing Songwriter as I brushed my teeth last night. And as I ran some errands in the car earlier today. It's got an extremely catchy rhyming chorus (I wanna be a song writer, I wanna be a wrong righter, I wanna take an all-nighter...), so it was basically inevitable.

    Tracks:
    1. (I Like It When You) Smile
    2. (I Do) Like We Do
    3. Tryin’ To Matter
    4. Songwriter
    5. Do You Really Need Her
    6. You Don’t Need A Man
    7. You Have No Idea
    8. Where Prisoners Drown
    9. (I Think I) Love You A Little Bit
    10. Every Time I Fall In Love
    11. Right Where It Hurts
    Harry Connick Jr in studio
    Can't get enough Harry? 

    Visit the official Harry Connick Jr website or find him on Twitter, Facebook, Instagram, and YouTube to stay up to date.

    Order That Would Be Me now from iTunes or Amazon!

    Food and Drink to enhance your listening experience - since Harry Connick Jr. exudes N'awlins flair, I knew my recommendations would have to be classic:


    There wasn't much talk of food or drink in the songs, but he does mention beer once and wine twice, so in honor of the wine mentions, I added a little wino twist to an otherwise classic gumbo...and it worked nicely. Lingering over a bowl of this with a New Orleans Gin Fizz in your hand and this album coming from the speakers is a delicious way to spend an hour or so.

    Chicken, Sausage, and Shrimp Gumbo
    This rich Louisiana-style stew is loaded with chicken, sausage, and shrimp served over rice.
    Print Friendly and PDF
    Chicken, Sausage, and Shrimp Gumbo
    by Heather Schmitt-Gonzalez
    Prep Time: 15 minutes
    Cook Time: 90 - 120 minutes
    Keywords: simmer entree soup/stew chicken sausage shrimp American

    Ingredients (3 quarts)
    • 8 ounces (2 sticks) unsalted butter
    • 1 1/2 cups all-purpose flour
    • 2 bell peppers, chopped
    • 1 medium onion, chopped
    • 1 celery stalks, chopped
    • 3 garlic cloves, minced
    • 8 cups chicken stock
    • 2 cups white wine (or more chicken stock)
    • 1 tablespoon Creole seasoning
    • 1 1/2 teaspoons kosher salt
    • 1/2 teaspoon ground black pepper
    • 1/2 teaspoon dried crushed red chile flakes
    • 1/2 teaspoon chili powder
    • 1/2 teaspoon dried thyme
    • 1 bay leaf
    • 2 pounds chicken breast, chopped into 1" chunks
    • 1 pound andouille sausage, cut into 1/4 inch-thick slices
    • 1 pound shrimp, shelled, tailed, and deveined
    • hot sauce, to taste
    • cooked white rice, to serve
    Instructions
    Melt butter in a 6-quart pot over medium-low heat. Stir in the flour, one-third at a time, until each third is incorporated into the butter. Continue to cook the roux, stirring often, until it has turned a deep, rich brown, 45 to 60 minutes.

    Add bell peppers, onions, celery, and garlic and stir constantly for 1 minutes. Slowly pour in the stock and wine, stirring as you go to prevent lumps. Add everything else to the pot except the shrimp hot sauce, and rice. Bring to a boil, then reduce to a simmer and allow to cook, uncovered, for 45 minutes, stirring occasionally.

    Add the shrimp and simmer until it just turns pink, 2-3 minutes. Remove from heat, taste and adjust seasoning with hot sauce or more salt and pepper to taste.

    Serve over hot rice.

    -inspired by and adapted from Chef Paul Prudhomme's Gumbo Ya-Ya (as served in Mr. B's Bistro in the French Quarter) via New Orleans Official Guide 
    Chicken, Sausage, and Shrimp Gumbo

    Wednesday, October 21, 2015

    Sweet Potato Ham Biscuits inspired by History and Ham in Smithfield

    A big thank you to Smithfield Foods and Hunter PR for sponsoring my trip to Smithfield, Virginia. All opinions shared in this article are my own.
    History and Ham in Smithfield, Virginia
    clockwise from top left: view of the James River from the lodge at Aberdeen Farm, "Magnolia"  of Smithfield's Porcine Parade, A cotton field in Smithfield county, P.D. Gwaltney, Jr. House

    Recently I was treated to a whirlwind 48 hour adventure in which I glimpsed the rich history and culture of Smithfield, Virginia. Before my trip, when I heard the word Smithfield, I associated it with ham. I think that's a pretty appropriate reaction to a town that is home to the world's oldest ham, a porcine parade, and thick humid air that delivers the scent of smoked ham to your senses the moment you step foot in town.
    Friday, October 16, 2015

    Tangzhong Whole Wheat Bread | #BreadBakingBabes

    Tangzhong Whole Wheat Bread
    I'm so excited about this month's Bread Baking Babes challenge, as chosen by this month's kitchen-of-the-month, Karen at Karen's Kitchen Stories. She assigned us the task of making a Tangzhong-style bread, which is one of those things I've been wanting...meaning...to make for years. I don't know why I've put it off. I tend to do that. It was definitely worth the wait—but it does make me want to kick myself for not getting with the program sooner.

    Not familiar with the Tangzhong method? Basically, a tangzhong is a cooked water roux (or flour paste). One part water and five parts flour are cooked to 149° F (or 65° C) and then cooled. The tangzhong is then used as an ingredient in bread dough, which makes for an incredibly bouncy bread that can stay soft for days.
    Friday, October 9, 2015

    A Devilishly Good Halloween Party!

    This is a sponsored post written by me on behalf of Casillero del Diablo Wines. All opinions are 100% mine.
    A Devilishly Good Halloween Party with Casillero del Diablo Wines
    This one is for all of the grown-ups out there who enjoy a little Halloween fun as much as the kids do. I'm partnering with Casillero del Diablo Wines, the single most distributed wine brand in the world (and sold in over 146 countries), to bring you ideas for throwing A Devilishly Good Halloween Party. Once the front porch lights are extinguished and the trick-or-treaters have dumped out and sorted all of their goodies, it's your turn.

    This party starts with a century-old legend. The Legend of Don Melchor de Concha y Toro, the founder of the Concha y Toro winery in Chile, built a wine cellar (or "casillero") for storing his very best wines. One day he noticed that his wines were disappearing from his cellar. He suspected a thief, and in order to protect his wines, he started a rumor in the community that his casillero was haunted by the devil himself! The rumor spread through the town, and his cellar became known as the casillero del diablo—or the devil's cellar! His plan worked, and his wines were never stolen again.
    Thursday, October 8, 2015

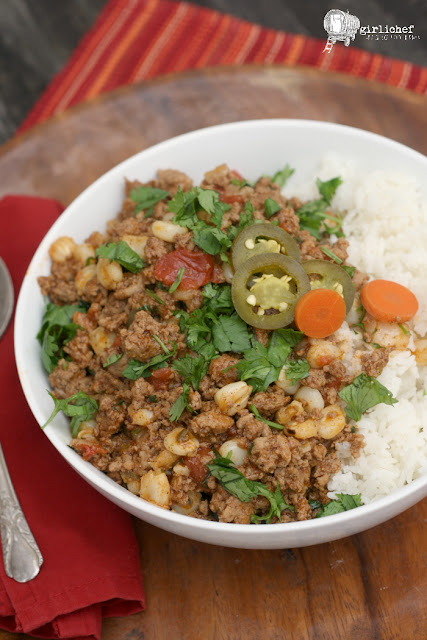
    Quick Turkey and Hominy Chili

    Quick Turkey and Hominy Chili
    My hunt to add more easy weeknight meal options to our dinner rotation is ongoing. If I don't actively experiment and look for inspiration, I find myself in a rut, making the same things over and over again. Every once in a while, I head to the library and come home with a giant stack of magazines. I've been known to spend hours scouring the pages, ripping my library receipt into little strips to mark the pages that inspire me. I actually find the process calming and productive at the same time.

    I was doing just that a few months ago when I came across a recipe for a simple, hearty chili in the June 2015 edition of the Food Network Magazine. It was actually the first thing that I made from all of the recipes I tagged that day, adapting it slightly by adding more hominy (because I love the chewiness and earthy flavor), more spices (because I love flavor), and some masa harina to accent the hominy.

    This isn't chili in the way that I normally think of chili, like a warming stew, it's actually closer to the meat sauce variety. Aka, there's not a whole lot of liquid. But they recommended serving it over rice, and that was right on. The little bit of liquid that it does have soaks in and adds some flavor to white rice. Oh, and it was on the table in 30 minutes.

    Quick Turkey and Hominy Chili
    Spiced turkey and chewy hominy are the stars of this easy, hearty weeknight meal.
    Print Friendly and PDF
    Quick Turkey and Hominy Chili
    by Heather Schmitt-Gonzalez
    Prep Time: 5 minutes
    Cook Time: 25 minutes
    Keywords: turkey hominy entree

    Ingredients (serves 4-6)
    • 3 tablespoons olive oil
    • 2 onions, chopped
    • 1/4 cup chopped pickled jalapeños + more to garnish
    • 1 tablespoon brine from pickled jalapeños
    • 6 cloves garlic, minced
    • 2 1/2 pounds ground turkey
    • 2 1/2 tablespoons chili powder
    • 1 tablespoon masa harina
    • 1 tablespoon smoked paprika
    • 2 1/2 teaspoons ground cumin
    • 1 (14.5 ounce) can fire-roasted diced tomatoes
    • 1 (25 ounce) can of hominy, drained and rinsed
    • 2 cups chicken stock (or turkey stock or water)
    • 1/2 teaspoon salt, smoked or regular
    • 1/2 teaspoon freshly ground black pepper
    • big handful of roughly chopped cilantro
    • 2 cups hot cooked rice, to serve
    Instructions
    Heat olive oil in a large pot over medium-high heat. Add onion, jalapeños, garlic, and a couple pinches of salt and pepper. Cooking, stirring, until onion is tender, ~5 minutes.

    Add turkey, masa harina, chili powder, smoked paprika, and cumin; cook for another 5 minutes or until turkey has browned, breaking it up as it cooks. Add tomatoes and cook for another 5 minutes to start to break down the tomatoes. Add hominy, chicken stock, salt and pepper. Bring to a simmer, then reduce heat and cook until thickened, ~10 minutes.

    Stir in the jalapeño brine and half of the cilantro. Taste and adjust seasoning as necessary. Serve over hot rice, garnished with extra cilantro and some more pickled jalapeño, if you wish.

    -slightly adapted from Food Network Magazine, June 2015
    Quick Turkey and Hominy Chili
    Quick Turkey and Hominy Chili
    Tuesday, October 6, 2015

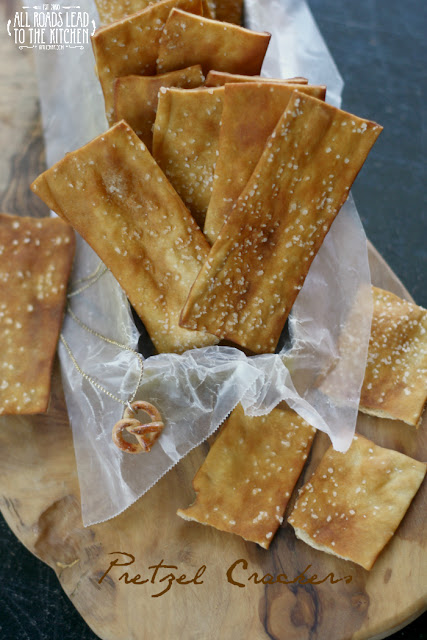
    Pretzel Crackers

    Pretzel Crackers
    Did we skip September this year? I have no idea how it's already the sixth day of October...the sixth day and the first Tuesday...and that means it's time for another edition of Twelve Loaves! Our host this month is Camilla from Culinary Adventures with Camilla, and our theme is Crackers, Crisps, and Flatbreads. Pretty fun, right? I think so.

    I actually knew what I was going to make the minute Camilla announced our theme. I've had these pretzel crackers sitting on the backburner of my brain for a couple of years now, so what better time to finally get around to making them. You may know that I am one in a family of pretzels lovers—because I've talked about it numerous times in the past. And while I've made my fair share of soft pretzels in the past, I've never ventured into making my own hard pretzels.

    I guess I can't say that today is any different since I'm not technically making hard pretzels, but I am making crackers that have the taste and crunch of hard pretzels...so I'm one step closer. I've slightly adapted a recipe from one the most-loved cookbooks from my shelves, Pretzel Making at Home. I'm pretty sure that I'm going to bake my way through that entire book before too long (it's also where I got the genius recipe for these pretzel croissants).

    So, I guess you're probably wondering how the crackers actually tasted? They tasted like thin, crispy pretzels, so - INCREDIBLE! The batch didn't last much longer than 24 hours. The key is rolling the dough out very thin so that that they will be crisp all the way through. I used some of them to as a base for the Apple-Cheese Spread that I made last week, but they're also good just as they are.

    Don't forget to scroll down past the recipe to see more cracker, crisp, and flatbread recipes from this month's Twelve Loaves bakers!

    Pretzel Crackers
    This homemade pretzel cracker recipe gives you that classic pretzel taste in a thin, crisp, buttery cracker.
    Print Friendly and PDF
    Pretzel Crackers
    by Heather Schmitt-Gonzalez
    Prep Time: 1 hour, 30 minutes (includes resting time)
    Cook Time: 12 to 15 minutes
    Keywords: bake appetizer snack vegetarian

    Ingredients (48 crackers)
    • 255 grams (~2 cups) all-purpose flour + more for work surface
    • 1 tablespoon packed brown sugar
    • 1 teaspoon fine sea salt
    • 2 ounces (4 tablespoons) cold unsalted butter, diced
    • 1/4 cup + 3 tablespoons ice water
    to finish:
    • 1 cup water
    • 2 teaspoons baked baking soda (see notes at bottom)
    • coarse salt, for sprinkling
    Instructions
    Whisk the flour, brown sugar, and salt together in a medium-sized bowl. Drop in the diced butter and use your fingers to rub the butter into the mixture, much like you would when making a pie crust, until you have crumbles the size of rice.

    Add the water and use a rubber spatula to stir until it comes together in a shaggy mass.

    Turn out onto a work surface and knead until all of the flour is incorporated, working as quickly as possible so that you don't melt the butter pieces. You will have a dough that is slightly tacky, but not sticky.

    Cut the dough into two equal portions, then wrap each one in plastic wrap and refrigerate for 1 hour.
    Put the 1 cup of water into a small spray bottle, then set a funnel over the bottle and add the baked baking soda. Put on the lid and shake gently until all of the baking soda has dissolved. Set aside for now.

    If you have two racks in your oven, place one in the upper third of your oven, and the other in the lower third. If you don't, just leave your rack in the middle and bake in two batches. Preheat oven to 400° F. Line two baking sheets with parchment paper.

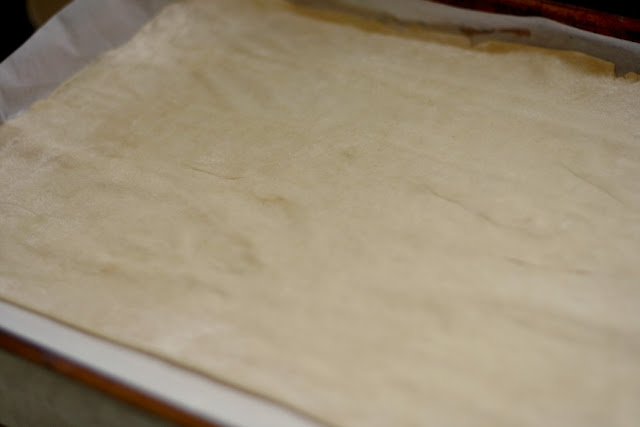
    Lightly flour our work surface. Working with one portion of dough at a time, roll out into a thin rectangle that is roughly 10" x 16" and between 1/8" and 1/4" thick (I found the thinner you rolled it, the more pretzely they were). Use your hands to gently pull and stretch into form if need be (you can also trim and straighten the edges and corners with a metal bench scraper). Brush any excess flour off of the dough.

    Give your spray bottle a gentle shake, then evenly spray a fine mist of the solution over one of the sheets of parchment paper that you've set on a baking sheet. Gently pick up your sheet of dough, using your rolling pin to help, and lay it on the sprayed sheet of parchment. Try to do this evenly, because it's really hard to reposition the dough once you've set it on the wet parchment.
    Pretzel Cracker Dough
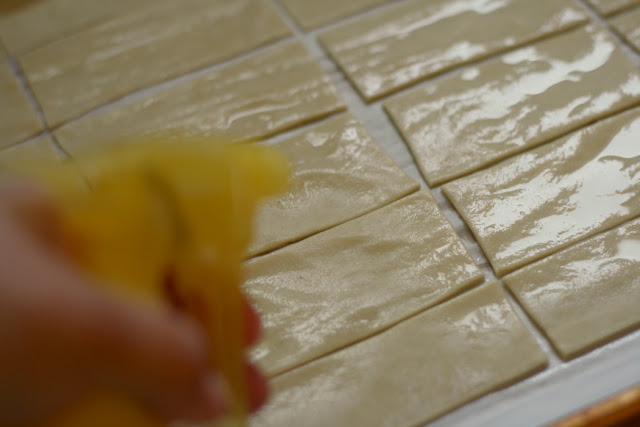
    Use a metal bench scraper or pizza roller to cut the dough into 24 even rectangles.
    Pretzel Cracker Dough
    Spray the top of the dough evenly with a fine mist of your solution, taking care to coat the entire surface. Any part that isn't wet will not turn that dark, burnished pretzel color when baking.
    Pretzel Cracker Dough
    Sprinkle coarse salt over the wet dough. Repeat with the other half of the dough.
    Pretzel Cracker Dough
    Slide into preheated oven and bake until brown and crisp, 12 to 15 minutes. If you're baking both sheets at once, rotate the pans from front to back and top to bottom halfway through baking. If just baking one pan at a time, rotate the pan so the back is in the front halfway through baking.
    Transfer to a wire rack to cool completely. Store cooled crackers in an airtight container for up to 2 weeks.

    Notes:
    To make baked baking soda, preheat the oven to 250° F. Scoop about 1/4 cup of baking soda onto the bottom of a pie plate and shake to spread evenly. Bake for 1 hour. Allow to cool completely, then store in an airtight container at room temperature indefinitely. You can make more or less in the same manner. Use this to replace the lye that is called for in pretzel-making recipes.

    -slightly adapted from Pretzel Making at Home by Andrea Slonecker
    Pretzel Crackers

    #TwelveLoaves is a monthly bread baking party created by Lora from Savoring Italy and runs smoothly with the help of Heather of All Roads Lead to the Kitchen, and the rest of our fabulous bakers.

    Our host this month is Camilla from Culinary Aventures with Camilla, and our theme is Crackers, Crisps, and Flatbreads. For more bread recipes, visit the #TwelveLoaves Pinterest board, or check out last month's mouthwatering selection of #TwelveLoaves enter last month's #TwelveLoaves Seeded Breads!


    If you'd like to bake along with us this month, share your Crackers, Crisps, and Flatbreads using hashtag #TwelveLoaves!